Friday, September 6, 2013

How to Bleach a Shirt: Method 4 (Freezer Paper and Spray Bleach)

So this is the last and the greatest way to bleach a shirt (in my opinion)!!!!

Basically you do everything that you would do for the first method with the spray adhesive. So I will not go into great detail about this one but I will put the pictures up for you to see!!

I made 4 shirts (successfully) with this method. 1) Harry Potter Deathly Hallows ; 2) Bad Wolf TARDIS ; 3) Ich liebe dich (it means "I love you" in German) ; and 4) Let It Be with 3 flying birds


What you need:


  • Xacto Knife
  • Scissors 
  • Pencil and/or pen
  • Plastic cutting board from Wal-mart (super cheap!) 
  • Cardboard/plastic bags 
  • Bottle of bleach water
  • T-shirt of your choice
  • Freezer Paper
  • Tape
  • Iron


1) Find the template online. Put in Word Document or Word Publisher. Change the color to grey so it will save on your ink

2) Trace the template on the freezer paper (on the not-wax-paper side). My helpful hint is wrap a small about of tape on the edge of both so it doesn't move while you trace it. 

3) Use the Exacto Knife to cut it out. 

4) Iron it on your shirt (wax paper side down). 


5) Put cardboard inside the shirt to protect the back. Then spray it with the bleach water. DO NOT OVER BLEACH!!!! It will seep under the template and ruin your design. 

6) Wash it in the sink to get all the bleach out and then wash it on the quick cycle by itself in the washing machine. 


Wednesday, September 4, 2013

How to Bleach a Shirt: Method 3 (Freezer paper and Bleach Pen)

So, this is the third way that I have tried to make a bleached t-shirt. Let me just say that I HATE this method with a passion! (Moreso than the hot glue gun approach)

I made my BBC Sherlock Holmes t shirt with this method. It is so not even perfect. I really want to make another one with spray bleach.

Anyways,
 WHAT YOU WILL NEED: 

  • 1-2 Bleach Pens (Amount depends on the size of your template and what you want on the shirt)
  • Freezer paper (I swear by this stuff. But other people like contact paper)
  • Exacto Knife and/or scissors 
  • Colored t shirt
  • Cardboard or trash bags or plastic lids
  • Lots of patience
  • Iron 
  • White wash rag (optional: I used one because I over-bleached as usual)
  • Cheap plastic cutting board from Wal-Mart
  • Clear tape 
  • Pencil

1) What I did was Googled "I am SHER Locked" and tons of templates came up. Next, copy and paste it to a Word Document or Word Publisher (my new best friend). I cropped the picture enough so I could expand it to the who page. Helpful hint: change the color of the picture to gray so you will not use up all of your expensive printer ink. You're Welcome. 

2) Trace the template on the freezer paper with a pencil. HELPFUL HINTS: A) Freezer paper has two different sides (DUH!). One side is wax paper (that means it will be smooth and waxy) and the other is not wax paper (see what I did there?). You draw on the not-wax-paper side.  B) Get some clear tape and tape the edges of the template and the freezer paper together so that it will not move. 

3) After you cut the template out you iron it on to the shirt (wax paper side down). 

Funny story: I did this project in my kitchen one weekend and my niece was at my house. She is almost 2 years old. It was late and I wasn't paying attention and my arm decided to touch the iron and I burnt my arm on the iron (I still have a faint burn mark). When I showed my boo-boo to Addie she kissed it and then she tried to spake my dog, Scruffy, because she thought that he hurt me. She kept yelling "Bad bad Flubby. Bad Bad." 


4) Next you use the bleach pen to bleach your shirt. 

As you can see in the picture below, there are brush stroke marks in the "SHER" part and the "E" did not bleach a full square. :(  I hate bleach pens and I will never use them for these projects again. 

5) After you pull the template off, wash in the kitchen sink until the bleach is all gone. Then run it through the quick cycle in the washing machine by itself. 


Let me know what yall think! Especially if you have had better success with Bleach Pens. 


Saturday, August 31, 2013

How to Bleach a Shirt: Method 2 (Hot Glue Gun and Spray Bleach)


This is the second post on DIY bleaching T-shirts. This method is not my favorite but it might work for some of you. I got overzealous with my bleaching one day and decided to use this method. It did not work out at all! Mainly because I over bleached.


Here are the four types I tried:

1) Spray Adhesive and Cardstock Template
2) Hot Glue Gun and Spray Bleach
3) Bleach Pen and Freezer Paper Template
4) Freezer Paper Template and Spray Bleach (THE BEST OPTION BY FAR!!)


What you will need for Method 2:

  • Hot glue gun (bigger the better)
  • T-Shirt
  • Bottle of spray bleach
  • cardboard 


This method is simple. Use the hot glue gun to make the design on the shirt you want. Then put the card board in the shirt to protect it. Then spray it with the bleach water. Afterwards, wash it in the sink then wash it on its own in the washing machine on a quick cycle. 

DO NOT OVER BLEACH!!!!! You will ruin the shirt! 


This is what happens when you over bleach! For colored shirts you do not want the outcome to be straight white like the picture below. The goal is to make the bleach parts become a lighter shade of the color of the shirt.


Let me know is this method works better for you! 

Friday, August 30, 2013

How to Bleach a Shirt: Method 1 (Spray Adhesive and Card Stock paper)

I recently became obsessed with the "bleached shirt" look. I have several of my own. It has been a learning processes. I tried four different ways. One of which is, in my opinion, the best way to go about it. The other three are just not up my alley. Luckily the processes are not that hard to learn. I will go through all four types and my experiences with each.

(NOTE: I made these projects several weeks/months ago. Therefore, I will not have pictures of every step, but I will explain in great detail each step)


Here are the four types I tried:

1) Spray Adhesive and Cardstock Template
2) Hot Glue Gun and Spray Bleach
3) Bleach Pen and Freezer Paper Template
4) Freezer Paper Template and Spray Bleach (THE BEST OPTION BY FAR!!)


What you will need:

Type 1: Spray adhesive and Cardstock Template

  • spray glue adhesive (Elmers is best)
  • Card stock
  • Xacto Knife
  • Scissors 
  • Pencil and/or pen
  • Plastic cutting board from Wal-mart (super cheap!) 
  • Cardboard/plastic bags 
  • Bottle of bleach water
  • T-shirt of your choice

For method one I made my Hunger Games Mockingjay shirt. This is the first shirt I made and I over bleached it. Go figure right?


Step 1: Find the template that you want from Google/Bing/Pinterest/etc. Once you find the template that you want copy and paste it to a Word Document. I now prefer Word Publisher, it is easier to deal with when you are editing pictures and such.

Step 2: Determine the size you want your design to be on your shirt. Then print it out on card stock. Do not use regular paper with this particular method. Card stock is really thick paper and will be easy to peel off the shirt.

Step 3: Cut the design out. Here comes the fun part. You have to decide if you want your design to stay the color of the shirt or if you want it bleached out. For this shirt I wanted the Mockingjay to be black, so I cut the design out and was really careful about the small edges and corners.

Step 4: Spray the back of design with the spray adhesive. Put the design on a plastic bag or a sheet of wax paper before you spray it.

Step 5: Before you spray the shirt, make sure that you put an ample amount of cardboard or plastic bags (I have even used the plastic lids to tubs). You do not want the bleach and/or the design to bleed through to the back of the shirt.

Word to the wise: DO NOT OVER BLEACH!!!  It will soak through the shirt and under the template and it will not look right at all.


Step 6: When you are done bleaching the shirt let it dry a little bit and then pull the template off. 

Step 7: Rinse the shirt thoroughly in the kitchen sink and make sure that all the bleach is out of the shirt.  Then wash the shirt by itself in the washing machine on quick cycle. 


If you try this method and have better success and/or like it best let me know about your experiences. I am always interested in hearing about others crafty successes.


Wednesday, August 28, 2013

Side Projects #2: Spray Paint EVERYTHING!! (Part 2)

So continuing with my spray paint thrifty items theme, this post will be about awesome items I spray painted that I got from Goodwill.  This post will be short and boring but with pretty awesome pictures! 


The first one on the left I got from Goodwill for about $3. Surprisingly, it is a candle holder. My friend Tiffany said that it looks like a "flower eating a pineapple". The original color is some Earthy Brown color (yuck!). I decided to paint it white first (using cheap Wal-Mart brand spray paint, NEVER AGAIN!) then paint it the Krylon "lime green". 

The one on the right is the same as the first. It is a candle holder and I got it at Goodwill for about $3. The original color is pretty but I like it better as Lime Green. 


I added the last two pictures because the glare is so bright on the lime green pictures. I still haven't figured out how to make my iPhone see the object the exact way that I see it. But I guess that will be technology of the future. Oh well. 


Hope you enjoy! Let me know what you think!!! 

Tuesday, August 27, 2013

Side Projects #1 : Spray Paint EVERYTHING!! (From Thrift Stores)

Recently I have been hyper-focusing on all things spray paint! Thanks to Pinterest! These projects I painted while I waited for the paint to dry on my bedside table. (See my first post)

I found quite a few treasures at the Goodwill and a local thrift store (owned by a good friend of mine). Each were fine the way I bought them, but they were not my style (as you will be able to tell I love bold and/or bright colors). 


1) I bought this curtain rod at a yard sale for $3. I did not use primer because I am an idiot the beautiful Valspar spray paint can says "Paint + Primer in one" (I should sue for false advertisement). The picture just under this one are the two rods with the paint on them. Currently, the stupid paint will not stick so I am going to strip it all down and start over. 


2) I LOVE PAINTED BRICKS!!!! So as you can see in the picture above ^ , I used a brick to hold the rods while they dried  attempted to dry in our wonderful 70% humidity in the South. Most of the brick got painted so I decided to finish it and paint the rest of it. This brick is from our old fireplace, so it has significant meaning to me. Plus I enjoyed telling my step-dad that I stole one of his bricks. Although he didn't seem to care because it was a "small" brick. 


3) You cannot really tell (because the lighting is not the best and I took the pictures with my iPhone) but this piece really DID change colors, I promise. I got this small dove statue at my friend's thrift store in my hometown. I got it for $1.40 (I think). It was originally a weird beige/cream color. I did not want this piece to be a wild/crazy color so I got a can of  Krylon "Bright White" spray paint. I love it now! I love Doves! We have so many in my neighborhood. 


4) Lastly (for this post at least), I got this beauty at Goodwill. I think that I paid about $3 for it. I have no idea what it is. My mom thinks that it is suppose to be for a large marble ball. Who knows? I might use it for loose change, or some jewelry. It was the same color as the Dove above. I got the brown/bronzy spray paint from my Cousin Dakota. We used it to redo a lamp of his (will post about it later). The paint is from the Rust-oleum brand from Wal-Mart. It costs about $5 or $6, unfortunately it was one of the more expensive cans because it is a specialty paint. When it dries it leaves pretty pattern, like random shiny circles. 


This is all for this post!! I will post more of my spray painting adventures soon! 

Let me know what you think!! :) 


Monday, August 26, 2013

Turning Drab to Fab: Spray painting furniture

Welcome!! This is my first post ever!! So please bear with me as I learn how to properly post and blog.


What you need

  • Ugly Furniture
  • Spray Paint (both primer and various colors of your choice)
  • Sandpaper (lots, ranging from very coarse to very fine)
  • Power sander or a small hand sander 
  • Rubber Gloves
  • Painters Tape
  • Trash bags and/or plastic tarps 
  • Old clothes to wear while painting
  • Some good music and a pretty day! 
  • LOTS OF PATIENCE!!!! 


My mom bought this bedside table for me at a local consignment store (I will not even mention how much it was). Then I had the thought that I should paint it because it is way too ugly, not my style.


I have never taken on such a huge project before. So I started researching and I realized that I had to sand it down before I painted it. I was stupid and I hand sanded it! NEVER AGAIN!!

Anywho, look at my makeshift crafting station! (please ignore my dirty backyard, I tend to be messy when I craft.) And my doggie Scruffy took a moment to sniff around and take a picture!

(Note: The two janky looking benches on the left will be my next major project! We have had them for too long to not fix them!!)


Here is a closer picture of what it looks like sanded. 


I will always and forever more use primer spray paint. I used the Rust-oleum brand from Walmart. I think it was about $4 a can. Unfortunately I had to use all of both cans because I screwed up the first time. I sprayed it all at once. Thats a BIG no-no!! You should spray thin layers (maybe 3-4).


So the picture above and the one below are why you need some trash bags. I did not want the inside (where the drawer goes) and the back painted. So I used trash bags and painters tape to protect it. The back has the brand name and year. This piece was made in 1965 and it use to smell like an antique store.  :) 


This is what is looks like when you screw up. I had to spend a few hours stripping the paint enough to repaint it. 


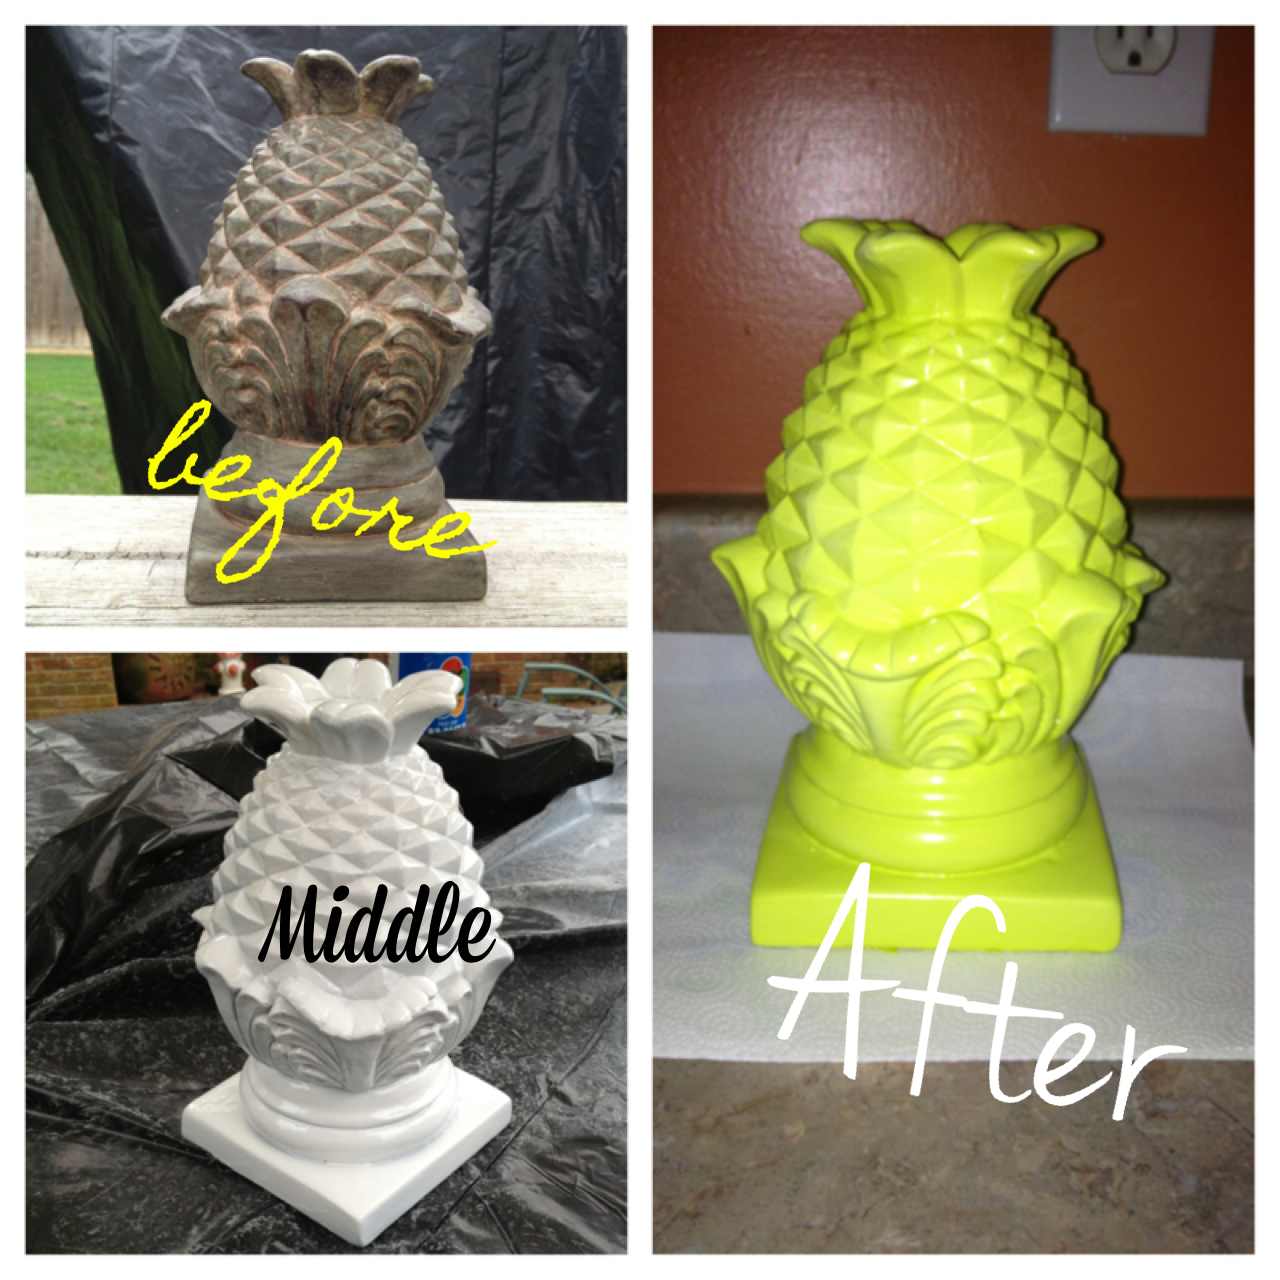
Next, I spray painted the table Ocean Breezy Blue (Krylon brand). While waiting for my table to dry I painted other random awesome stuff (will blog about it later), and I had the thought that the two raised parts on the drawer would look awesome as another color. I just happened to have a Lime Green spray paint (also Krylon brand). So I taped off the parts I wanted to stay blue and I painted it green!!


YAY!! This is the final project!! It looks so much better!!! I love the green and blue together!! 

Also I bought a new knob at Lowe's for about $4. It doesn't match but I loved the knob so much I had to get it!! 


FINAL THOUGHT: Just know that your project is YOUR project! However you make it is beautiful! You are the artist, the crafty person, you can make your project unique. 

So tell me what yall think!!